17. Data Logging via Email
Using IFTTT's services you can send emails via HTTP to a specific email address.
|
Configure IFTTT to send emails
In order to use IFTTT's services, you need to create an account for each email address to which you want to send email notifications. In this example application, a mail is sent when a certain temperature value measured with a temperature sensor is exceeded. An IFTTT account is set up as follows:
| • |
Go to the page http://www.iftt.com and enter the desired email address

|
| • |
Choose a password and click Sign up

|
| • |
You are now logged in (in this case as abcxyz_gmail_com). Write down the email address and the password. Click on the button My Applets, then on New Applet and on + this.
|
| • |
Under Choose a service you write web in the search box and click on the tile Webhooks..
Choose a service |
 |
|
| • |
Click on the tile Receive a web request

|
| • |
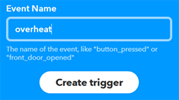
Select an event name and click Create trigger

|
| • |
Click on + that and on the tile Email
|
| • |
Under Choose action select Send me an email
 |
 |
Follow the instructions: Enter the email address and the PIN you received |
|
| • |
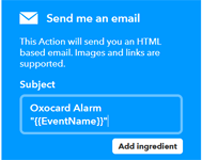
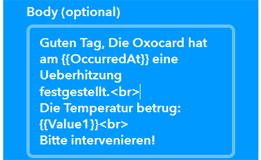
Under Complete action fields, fill out the form and click Create action. To do so, you define the subject and a part of the content of the mails. You use the placeholders {{EventName}} for an event identifier (here overheat) {{OccurredAt}} for the current date-time and {{Value1}}, {{Value2}} and {{Value3}} for optional URL parameters (see later). You can also use HTML tags, especially for umlauts and accents

|
| • |
Click on Finish and you will get a confirmation

|
| • |
Click on the Webhooks icon and then on Settings

|
| • |
Copy the URL into a Web browser and you will get a key that you should keep because you need it in the Python program

|
Example 1: Send an email when the temperature exceeds a certain value
In this example, the temperature is measured with the Sensirion sensor. If the value exceeds a certain limit, an alarm message is sent by email. In order to trigger the mail transmission with IFTTT a GET request must be sent to the server http://maker.ifttt.com with the following option::
/trigger/overheat/with/key/{key}value1={value1}&value2={value2}&value3={value3}
where {key} is your key and {value1}, {value2}, {value3} are the string values that should appear in the mail at the placeholders of the same name (do not use umlauts or special characters or encode them using URL encoding).
# Datenlogger1.py
from microbit import *
from linkup import *
from mbrobot import *
import sht

alarmTemp = 28
alarmRearmTemp = 27
host = "maker.ifttt.com"
port = 80
key = "oPn2kQcK5zgWtX_eR4JB6LKAc9xcpN6lm5WRty"
inquiry = "/trigger/overheat/with/key/" + key + "?value1=%d"
Wlan.connect("myssid", "mypassword")
client = HTTPClient()
alarmArmed = True
while True:
    t, h = sht.getValues()
    temp = int(t + 0.5)
    display.scroll(temp)
    if alarmArmed:
        if temp >= alarmTemp:
            print("Triggering alarm")
            alarmArmed = False
            insertBigChar(">", RED)
            client.connect(host, port)
            request = inquiry % temp
            print(request)
            reply = client.sendGetRequest(request)
            print(reply)
            client.closeConnection()
    else:
       if temp < alarmRearmTemp:
           print("Rearming alarm")
           alarmArmed = True
           insertBigChar("<", GREEN)
           sleep(100)
► Copy to clipboard
Explanations of the program code:
 |
alarmArmed = True: The mail should only be sent once if the temperature exceeds the alarmTemp threshold. Therefore, using the flag alarmArmed, the alarm is deactivated until the temperature falls below the threshold |
Example 2: Data logger by sending an email
An automatic measuring system should carry out measurements over a longer period of time and send a summary of the data by email. The micro:bit saves the data samples (time-value pairs) as text lines in a log file. In this demonstration the program takes every 10 seconds a new value and sends every 10 minutes the content of the log file as mail.
The data is stored in the file line-by-line in such a way that they are easily readable, namely as hh:mm:ss;temp, where hh are the hours, mm the minutes and ss the seconds, as well as temp the measured temperature. To separate the lines, the HTML tag <br> is used.
#Datenlogger2.py
from microbit import *
from linkup import *
from mbrobot import *
import sht
import ntptime, utime

def synchTime():
    Wlan.connect(ssid, pwd)
    ntptime.settime()
    Wlan.disconnect()

def sendMail(log):
    Wlan.connect(ssid, pwd)
    client = HTTPClient()
    client.connect(host, port)
    request = inquiry + log
    print(request)
    reply = client.sendGetRequest(request)
    print(reply)
    client.closeConnection()
    Wlan.disconnect()

ssid = "myssid"
pwd = "mypassword"
host = "maker.ifttt.com"
port = 80
key = "jGKt1Nz6XXRMfJGBhje0_FFWXMecvWkEs5wwSQ"
inquiry = "/trigger/MyLogger/with/key/" + key + "?value1="
synchTime()
logFile = "data.txt"
f = open(logFile, "w")
ready = True
while True:
    t, h = sht.getValues()
    temp = int(t + 0.5)
    yy, mm, dd, h, m, s, w, b = utime.localtime()
    f.write("%02d:%02d:%02d;%02d<br>" %(h, m, s, temp))
    display.scroll(temp)
    if m % 5 == 0 and ready:
        insertBigChar(">", GREEN)
        ready = False
        f.close()
        f = open(logFile)
        log = f.read()
        sendMail(log)
        f.close()
        f = open(logFile, "w")
    if m % 5 == 1 and not ready:
        ready = True
    sleep(100)
► Copy to clipboard
Explanations of the program code:
 |
synchTime(): At the beginning, the internal clock is synchronized with an NTP time server. However, the internal clock does not run very accurately for a long time (it could be synchronized again) |
 |
yy, mm, dd, h, m, s, w, b = utime.localtime(): Returns the date-time from the internal clock |
 |
f.open(logFile, 'w'):The log file is newly created and opened for writing |
 |
f.write("%02d:%02d:%02d;%02d" %(h, m, s, temp)):A formatted line is written to the log file |
 |
log = f.read():The content of the log file is copied to the string log |
 |
f.close():The log file is closed |
![]()


![]()


