| Deutsch English |
10. Internet of Things (IoT)
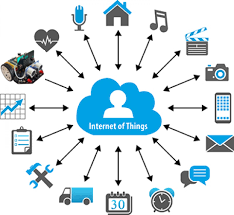
By installing WLAN-enabled microcontrollers, devices and systems (things) can exchange data and information over a network and communicate with higher-level systems. The IoT is a central area of today's society and economy. |
|
|
 |
A firmware (written in MicroPython) is installed on the ESP, which is completely transparent for the micro:bit programmer. The ESP looks to the micro:bit like an ordinary I2C sensor, to which simple commands are sent and which returns data (analogous to measurement data).
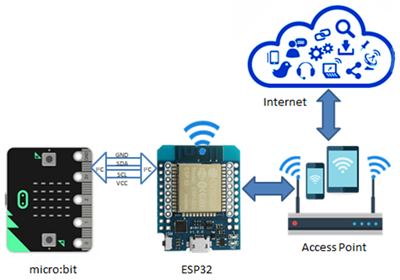
Connecting the ESP32 Coprocessor (LinkUp)
There are several ways to connect the ESP to the micro:bit:
| 1. | As LinkUp module on the Maqueen chassis (see chapter Installing LinkUp) |
| 2. | Via an I2C hub with Grove connectors. A Grove-compatible cable is soldered to the WEMOS ESP32 MiniKit module as shown in the following picture: The cable should be relieved by fixing it with hot glue. |
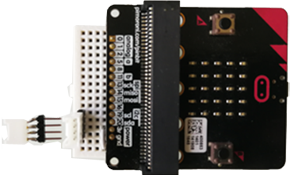
The micro:bit is connected via a Grove-compatible hub. Other sensors can also be plugged in the hub. Examples:
 |
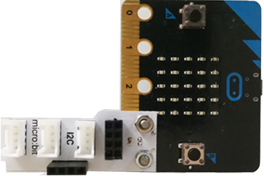 |
| Breadboard, pinbit and Grove-Connector | Didel mbHub (under construction) |
Refer to the chapter Installing LinkUp for information how to download the firmware.
Example 1: Query measured values of the distance sensor with a smartphone or PC
Web servers can be used to transmit measured values, such as sensor data, to a monitoring station. For this purpose, an HTML web page is dynamically supplemented with the measured values. Using any browser on a smartphone or PC, the data can be displayed and new information sent to the Web server via simple GET requests. No special smartphone or PC app is required.
SaveHTMLIot1.py uploads the HTML code to the ESP. It contains a format parameter %s, which is replaced by the measured value.
# SaveHTMLIot1.py from linkup import * html = """<!DOCTYPE html> <html> <head> <meta name="viewport" content="width=device-width, initial-scale=1"> <meta http-equiv="refresh" content="5"> </head> <body> <h2>Welcome to the mbRobot</h2> Current distance: %s<br> </body> </html> """ print("Saving HTML...") saveHTML(html) print("Done") |
|
If the browser makes a request to the web page, it sends an HTTP GET request to the server. This is interpreted as an event that calls the callback function onRequest() on the micro:bit. The return value of this function is a tuple or a list with the data used in the web page instead of the format parameters.
# WebIot1.py (GetDistance) from linkup import * from mbrobot import * def onRequest(clientIP, filename, params): d = getDistance() return [d] ipAddress = connectAP(ssid = "mySsid", password = "myPassword") display.scroll(ipAddress, wait = False) startHTTPServer(onRequest) |
|
Explanations of the program code:
| connectAP() : The ESP logs on to the existing access point with SSID and password and returns the received IP address that is shown on the display, because the browser has to use it as URL | |
| meta http-equiv="refresh" content="5": Establishes an automatic update of the web page every 5 seconds | |
| d = getDistance(): Measured value of the ultrasonic sensor | |
| startHTTPServer(onRequest): Starts a Web server that handles GET requests in the given callback function. This call is blocking |
Example 2: Monitor water level online
In the chapter Physical Computing the water level of a plant was monitored with the micro:bit. If the system is supplemented with an ESP, monitoring can be carried out via WLAN, e.g. with a smartphone. The micro:bit pins are also accessible on the mbRobot, so you can easily build a circuit with crocodile clips. One cable is connected to P1, the other to Pin 3V. At low water levels the measured values obtained with the command pin1.read_analog() are much smaller than at high water levels when the two contacts are in the water. The raw values are displayed in the browser of the smartphone or PC. |
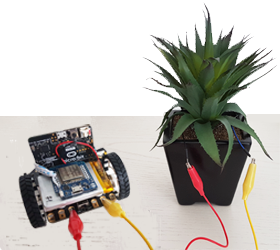 |
Remark: On the mbRobot P0 is used for the speaker. (You can interrupt this connection with a small switch on the Maqueen board.) P1 and P2 are used for the ultrasonic sensor. If you remove it, the two pins are free to be used for your own applications.
SaveHTMLIoT2.py uploads the HTML code. It contains a format parameter %s where the measured value should appear.
# SaveHTMLIot2.py from linkup import * html = """<!DOCTYPE html> <html> <head> <meta name="viewport" content="width=device-width, initial-scale=1"> <meta http-equiv="refresh" content="5"> </head> <body> <h2>Remote services</h2> Current humidity: %s<br> </body> </html> """ print("Saving HTML...") saveHTML(html) print("Done") |
|
When the onRequest() callback is triggered by an incoming HTTP GET request, the program performs the voltage measurement with read_analog() and returns the value in a list. This value is automatically inserted in the HTML page at the position of the %s parameter before the page is returned to the client.
# WebIot2.py from linkup import * from mbrobot import * from microbit import * def onRequest(clientIP, filename, params): v = pin1.read_analog() return [v] ipAddress = connectAP(ssid = "mySSID", password = "myPassword") display.scroll(ipAddress, wait = False) startHTTPServer(onRequest) |
|
Explanations of the program code:
| v = pin1.read_analog(): Performs a voltage measurement at P1 |

